

A high Ashtakavarga score doesn't guarantee an easy result. A low score doesn't cancel one. Yet much of the advice online treats a single number as a verdict, calling one house “strong” and another “weak” without asking which planet is active, whether the current dasha can deliver, or what the event specifically requires.
That's the central problem in Ashtakavarga chart analysis. The numbers are useful, but only when you give them the right job. Ashtakavarga is a quantitative map of support and effort. It can help you judge where a transit may find cooperation, where progress may require sustained work, and when a promising period still lacks the timing conditions to produce a clear event.
The honest question isn't, “Will this score make me successful?” It's, “What does this score change about the level of support, friction, and timing in this part of life?” That shift keeps the method practical and prevents the chart from becoming a machine for confident claims it cannot justify.
Table of Contents
- Why Static Scores Fail in Ashtakavarga Chart Analysis
- The Math Behind the Bindu Point Allocation
- Planet-Specific Baselines and Favorability Profiles
- A Practical Workflow for Transit and Dasha Timing
- Diagnostic Checks and Auditing Past Events
- Frequently Asked Questions About Ashtakavarga
Why Static Scores Fail in Ashtakavarga Chart Analysis
A Sarvashtakavarga score is a measure of combined bindu support for a sign or house. It does not independently describe the house lord, the active dasha, the planet in transit, or the result you want to assess. A static score can screen conditions, but it cannot function as a complete forecast.
Public explainers often use broad bands. A total around 25 to 30 bindus is commonly treated as average, 30 to 35 as strong, and a value above 35 as unusually strong, according to a practical Ashtakavarga interpretation guide. Use these ranges to rank initial conditions, not to issue a final judgment.
Support is not the same as delivery
A high score in a relevant house can show a more cooperative setting for that house's topics. It does not establish that a career change, marriage decision, or relocation will occur during the next transit. The active dasha must connect with the event, and the transiting planet must have the capacity to activate that promise.
The same caution applies to a low total. It can indicate resistance, delay, extra effort, or a need for stronger preparation. It does not automatically indicate denial. A favorable dasha and a clear natal promise may still produce an outcome under lower support, although the process may demand more work or offer less margin for error.
Practical rule: Treat Sarvashtakavarga as a condition report, not a verdict.
Static labels fail because they collapse several judgments into one adjective. “Strong” has practical meaning only after you identify strong for what, activated by whom, and during which period.
Replace the yes-or-no question
Resolve conflicting signals by giving each layer a defined job:
- What area is being activated? Identify the house and its concrete life topic.
- Which planet is moving? Its Bhinnashtakavarga score shows whether that planet has specific support in the sign.
- Which dasha is running? A period connected to the event generally carries more decision weight than an unrelated transit.
- What result is realistic? Support may indicate access, movement, opportunity, or capacity. It does not guarantee the final outcome.
This priority order prevents a high house total from overruling a weak planetary score or an unrelated dasha. It also prevents a low total from cancelling a well-supported promise without further examination.
Astrology can assist reflection and self-understanding, but it is not professional medical, legal, financial, employment, or mental-health advice. Use the chart to examine timing, support, and effort. Seek qualified guidance for high-stakes decisions.
The Math Behind the Bindu Point Allocation
The system begins with a simple unit. A bindu is a support point assigned according to fixed traditional rules. Each planet-sign relationship receives a value from 0 to 8, because the calculation draws from eight contributors: the seven visible planets, Sun through Saturn, plus the Ascendant or Lagna. A plain-language reference on the construction of Ashtakavarga describes these contributors as the basis for the planet-specific and combined tables.
The contributors don't assign points randomly. Their positions are assessed against fixed rules that determine whether a sign receives a bindu from that reference point. The result can be checked sign by sign and planet by planet, which is more disciplined than relying on a general statement such as “Jupiter is favourable.”
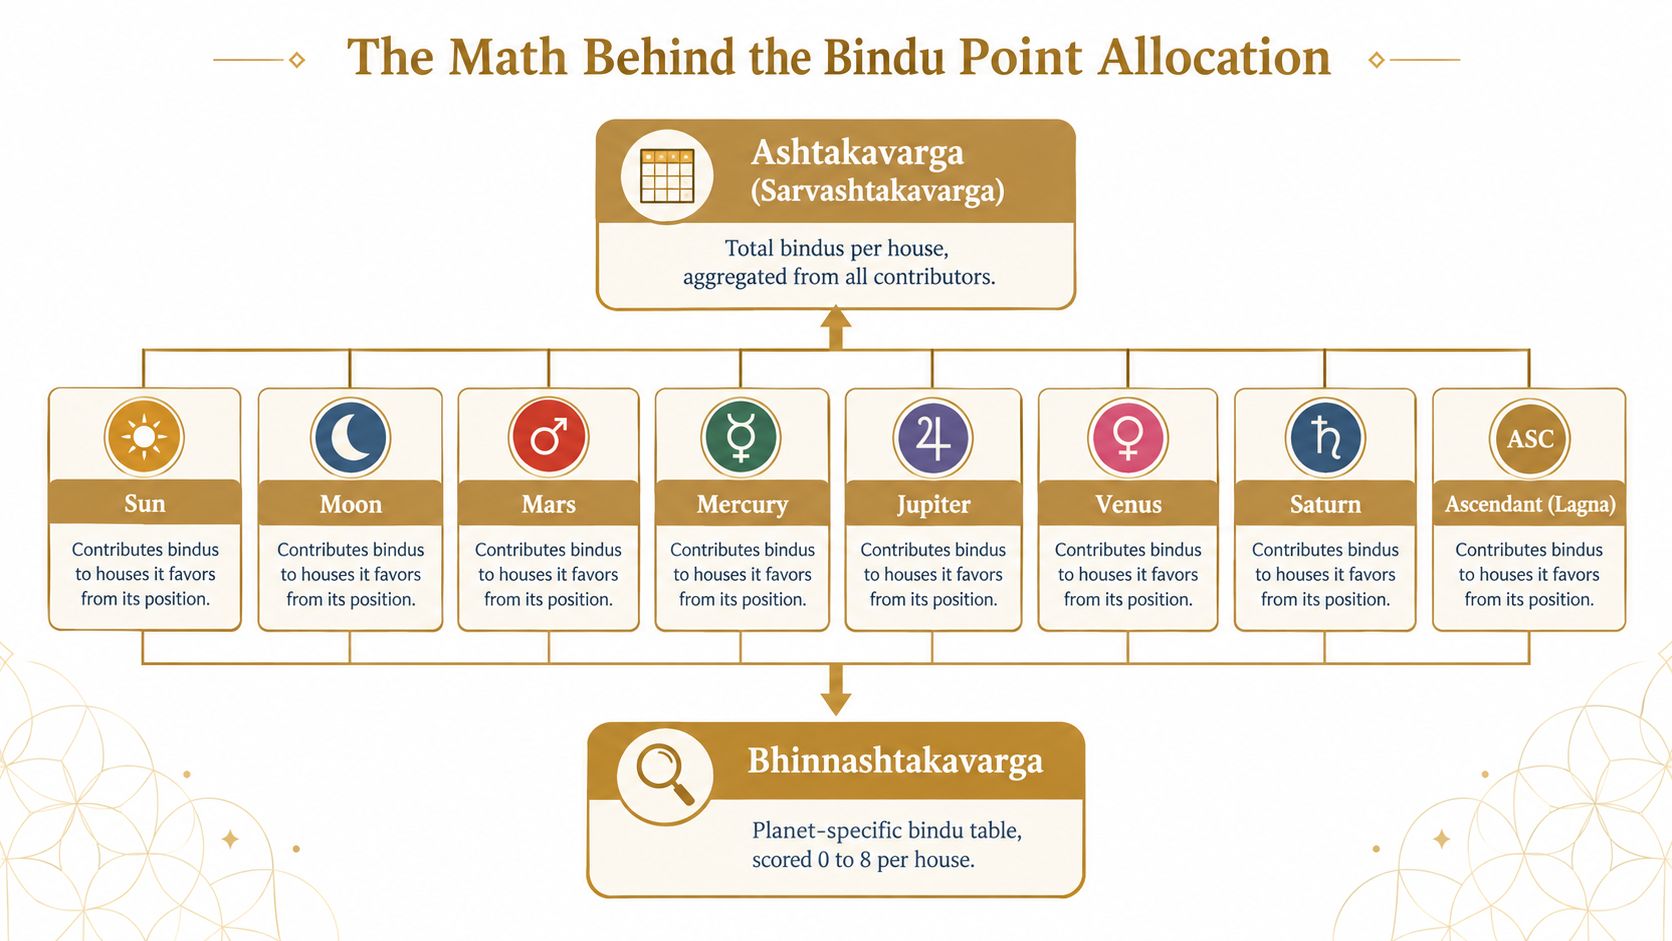
Bhinnashtakavarga shows the planet
Bhinnashtakavarga, often shortened to BAV, is the planet-specific view. It shows how much support a particular planet receives in each sign. Since each sign can receive between 0 and 8 points for that planet, BAV is the layer you consult when you want to understand a specific transit.
For example, if you're assessing a Jupiter transit, Jupiter's BAV value in the relevant sign matters directly. A house total alone can't tell you whether Jupiter itself has a supportive route through that sign.
Sarvashtakavarga shows the combined field
Sarvashtakavarga, or SAV, aggregates the seven planetary BAV tables into a combined total for each sign. The Ascendant contributes to the underlying Ashtakavarga structure, but the classical SAV total is formed from the seven planetary contributions. That gives you a broad view of the sign's combined support.
The classical framework has a fixed 337-point SAV total across the twelve signs, as documented in this historical and technical overview of Ashtakavarga. That constant acts as a checksum. If a properly calculated chart doesn't add up to 337, the calculation needs checking.
The historical lineage also matters. Classical references commonly connect Ashtakavarga with the Brihat Parashara Hora Shastra, while Varahamihira's Brihat Jataka mentions the method as well. A historical guide to Ashtakavarga places Varahamihira's reference around 500 A.D. and discusses the system's older roots. This isn't a modern scoring gimmick added to astrology apps. It's a durable quantitative method in Jyotish.
For a deeper explanation of why declared calculations matter, see Anvaya's math-first methodology. The practical lesson is straightforward: preserve the intermediate tables, verify the totals, and don't hide uncertainty behind polished language.
Planet-Specific Baselines and Favorability Profiles
A local score can mislead when you ignore the planet's distribution across the entire chart. Each planet has a fixed total across the twelve signs in the classical framework. That means one sign's value is part of a wider pattern, not an isolated measurement.
A reference table of classical Ashtakavarga totals lists the following planet-specific baselines:
| Planet | Total Bindus |
|---|---|
| Sun | 48 |
| Moon | 49 |
| Mars | 39 |
| Mercury | 54 |
| Jupiter | 56 |
| Venus | 52 |
| Saturn | 39 |
These totals constrain the way each planet's points are distributed. Jupiter's overall baseline is higher than Mars's or Saturn's, while Mercury's total is also comparatively high. That doesn't mean Jupiter or Mercury will always produce better results in a particular sign. It means you should interpret a local value in the context of that planet's complete allocation.
Why the profile matters
Consider two planets that each show a moderate value in the sign currently under review. Their totals across all signs may differ, so the same local score can carry different meaning within each planet's broader pattern. A practitioner who looks only at the one box on the table may miss that distinction.
This is particularly important when comparing transits. A planet-specific score answers, “How supported is this planet in this sign?” It doesn't answer, “How strong is the whole life area?” SAV answers the second question more directly, while the dasha and natal chart determine whether that area is ready to produce a meaningful event.
The tables are therefore better read as profiles than rankings. A high planet total doesn't make every transit favourable. A lower total doesn't make every transit unproductive. The chart still needs a relevant promise, a functioning significator, and a time period that can carry the result.
Read local highs against the full distribution
A useful audit compares three things:
- The planet's total profile, which shows how its points are distributed across the twelve signs.
- The target sign or house, which shows the local BAV and SAV values.
- The event being judged, which determines whether this planet is relevant.
This prevents over-indexing on one strong house. It also prevents the reverse error, where a practitioner sees a low local value and announces denial without checking the dasha or the natal structure.
The math supports comparison, not theatrical certainty. It gives you a repeatable way to ask why one transit deserves more confidence than another, while leaving room for the chart's other layers and for evidence from the person's lived history.
A Practical Workflow for Transit and Dasha Timing
Static thresholds should rank possibilities, not decide the reading. Timing becomes more reliable when you give priority to three signals in sequence: the transiting planet's BAV, the house's SAV, and the active dasha. Their agreement raises confidence. Their conflict identifies the condition that needs closer judgment.
For a planet-sign relationship, use 4 bindus as neutral, 5 to 6 as favourable, and 7 to 8 as very strong, as described in this guide to BAV and SAV interpretation. These are working thresholds, not promises of a specific event.
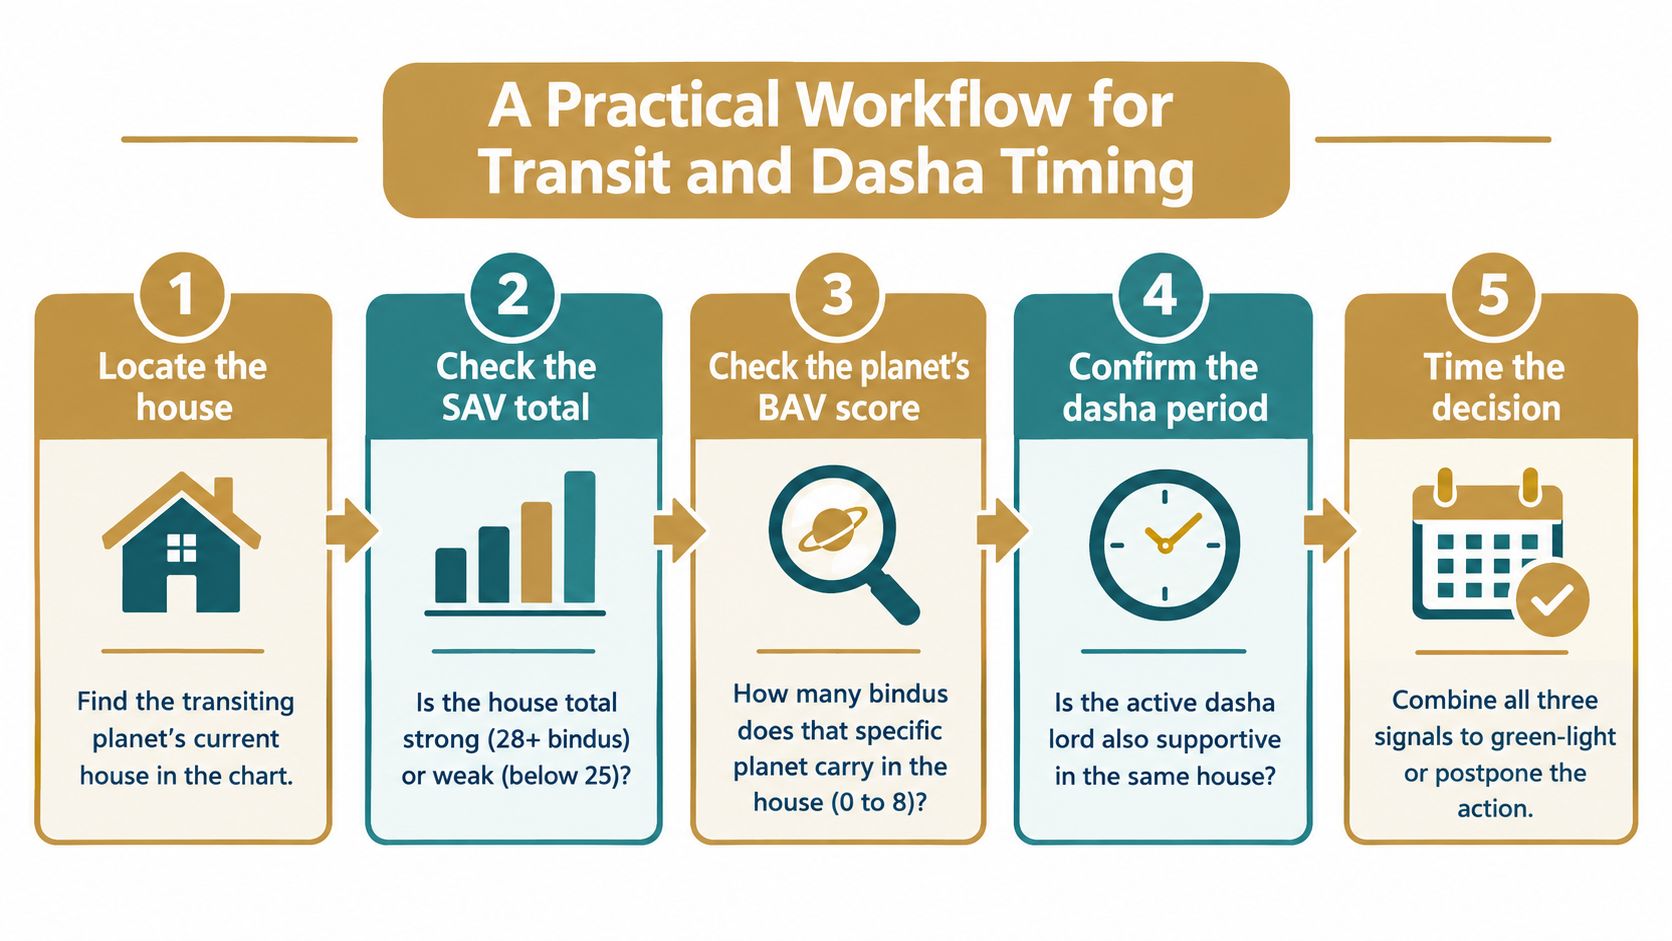
Step one begins with the moving planet
Locate the transiting planet in its current sign and identify the house that sign occupies from the relevant reference point. This establishes the field being activated. Start with the actual transit rather than selecting a preferred house and working backward toward a conclusion.
Check the planet's BAV score in that sign. A high score indicates support for the planet's operation there. A low score indicates friction, reduced ease, or a less direct delivery. The BAV describes the planet's route through the sign, not the complete condition of the life area.
Step two adds the house environment
Reuse the SAV bands introduced earlier, 25 to 30 as average, 30 to 35 as strong, and above 35 as unusually strong, to rank house conditions. These bands organize the comparison; they do not guarantee an event.
The four combinations provide a more useful decision matrix:
- High SAV, high BAV: The house environment and transiting planet support one another. Give this combination the highest practical priority, provided the dasha connects with the subject.
- High SAV, low BAV: The life area has capacity, while the planet may deliver through delay, strain, or imperfect conditions. Avoid treating the strong house total as a clean promise.
- Low SAV, high BAV: The planet has support in the sign, but the broader house environment may limit results. Expect effort, partial delivery, or an outcome that requires adaptation.
- Low SAV, low BAV: Assign this combination the lowest priority. It can describe friction or postponement, but it does not by itself prove denial.
Step three gives the dasha priority
The running dasha determines whether the transit has a channel into lived events. If the dasha lord connects with the relevant house, its lord, or the event's significators, the transit can activate a concrete matter. If that connection is absent, even a favourable SAV and BAV combination may remain a background condition.
That priority prevents common errors. A strong tenth-house total does not independently establish career advancement, and a favourable seventh-house score does not independently establish marriage. The active period must support the topic, while the natal chart must contain a workable promise.
Use a Panchang reference from Anvaya for day-level context when appropriate. Keep that context separate from the birth-chart and dasha assessment. Career, marriage, and relocation decisions should remain conditional, with the matrix used to rank timing quality rather than replace judgment.
Diagnostic Checks and Auditing Past Events
A useful Ashtakavarga reading should survive contact with the past. If a chart claims that a certain house was strongly supported during a period, compare that claim with a real event from the person's life. Don't select only a convenient success. Test difficult, ordinary, delayed, and mixed outcomes as well.
Take a hypothetical relocation that happened during a Jupiter transit. The first audit question is not whether the move was “good.” It is whether the relevant house, Jupiter's BAV value, and the active dasha all pointed toward movement or a change in living circumstances.
A simple audit sequence
- Record the event date: Use the actual period rather than a vague life phase.
- Identify the active dasha: Note the major and sub-period rulers that were operating.
- Locate the transit: Find Jupiter's sign and the house it activated.
- Read the matrices separately: Check Jupiter's BAV value first, then the house's SAV total.
- Describe the outcome precisely: A move may have brought opportunity and disruption at the same time.
This avoids hindsight bias. If the move occurred under a weak house total but a supportive Jupiter BAV and relevant dasha, the result might show that planetary delivery outweighed environmental friction. If the move happened under strong SAV but an unrelated dasha, the score may have described available support without producing the event itself.
Delay is not denial
A weak score should be tested against timing, not converted into a permanent statement. If the event eventually occurred after preparation, a later dasha shift, or a different transit, the earlier weakness may have described delay or cost rather than impossibility.
The audit also needs negative examples. If a supposedly favourable configuration produced no visible event, ask whether the promise was absent, the dasha was inactive, or the expected outcome was too specific. This is how practitioners learn which layer carries predictive weight in a particular chart.
Anvaya calls this kind of chart-first verification Pramāṇa, meaning calibration against lived events. Its calibration methodology reflects a useful discipline: establish what the chart says before inviting the person's story to shape the interpretation. That doesn't turn astrology into laboratory science. It does create a clearer record of what was calculated, what was inferred, and what happened.
Frequently Asked Questions About Ashtakavarga
Is a high Sarvashtakavarga score enough for a major life event?
No. A high SAV score shows stronger combined support in a sign or house, not a guaranteed event. Check the moving planet's BAV, the natal promise, and the active dasha before assigning predictive weight. A favourable score can make conditions more workable while still producing no event, a delay, or an outcome different from the one expected.
Which matters more, SAV or BAV?
Neither has universal priority. SAV describes the combined condition of the sign or house, while BAV describes the support available to one planet. During a Jupiter transit, Jupiter's BAV deserves direct attention. SAV shows whether the wider field supports that transit. If the two signals disagree, the dasha and natal promise help determine which signal should guide the decision.
How should couples use Ashtakavarga in compatibility work?
Do not compare one score from each chart and treat the relationship as settled. Review both charts, their relevant dashas, and the timing of the question. Look for areas where one person's active period supports shared aims, while the other chart indicates friction, delay, or different priorities.
Ashtakavarga can sharpen that comparison, but it does not replace a structured relationship assessment. Compatibility is not a single number. Timing, expectations, communication, and the concrete choices both people make remain part of the judgement.
Can digital calculators be trusted?
Only if you can inspect their calculations. A credible tool should distinguish BAV from SAV, apply the classical contributors consistently, and provide validation checks such as the fixed 337-point SAV total described earlier in this guide. It should also state the ayanamsha and computational conventions used, since traditions and software implementations can differ.
A polished grid does not prove that the interpretation is sound. Ask whether the tool preserves the underlying tables, identifies uncertainty, and allows past predictions to be audited rather than rewritten after the fact.
Why does the old mathematical structure still matter?
The method gives practitioners a repeatable way to compare planetary support with house-level support. Its historical record connects Ashtakavarga with classical Jyotish literature, including the Brihat Parashara Hora Shastra and Brihat Jataka. That lineage does not prove every interpretation, but it explains the system's continued use among practitioners who want more than symbolic description.
Use the system with restraint. Calculate carefully, separate SAV from BAV, give the active dasha its proper place, and test interpretations against lived events. Math comes first, language second. An honest reading states both what the numbers support and what they cannot establish.
Anvaya builds a persistent Samhita from declared Vedic chart computation, includes Ashtakavarga alongside dasha and transit layers, and uses Pramāṇa to calibrate readings against events you've lived. Generate your Samhita with Anvaya and examine your chart with a record you can revisit rather than a one-time horoscope feed.